Showing posts with label Simply Sketched. Show all posts

Friday, 30 May 2014

Simply Sketched

Well folks - it's Friday and I'm hitting the M25 Car Park!

Hubby is going to be home alone with his drum kit so get out the ear plugs!

Today I'm sharing 3 beautiful cards made with the soon to be retired hostess set - Simply Sketched

This set is available ONLY if you order at least £150 worth of products as it is only available with hostess benefits/stampin rewards.


I used the Woodgrain embossing folder and Ovals collection framelits on all the cards, I swapped the embossing folder on the last card... I quite like it that way round. All the ovals and sentiments were sponged with a Sponge Dauber using the corresponding ink and the images were coloured with Blender Pens.


The paper piercing was done using the Occasions Paper Piercing templates and piercing tool. 


Here are the product details if you are interested in buying them. Just click on the links.


Monday, 7 April 2014

Flower Fun

I have to apologise for my lack of posts - it was my wedding anniversary at the weekend and we also had our 6 year old niece to stay... it's hard work entertaining small children. I hope you had a fab weekend!

To top it all it is year end at work so I was at work for twelve and a half hours today! And I have an awful feeling I'm coming down with a strep throat.

It never rains...! Anyhow, to brighten my mood (before I take to my sick bed) I thought I would share this card I made a while ago.


The flowers are from Secret Garden, embossed in white embossing powder then coloured in Calypso Coral with a Blender Pen.

The leaves were fussy cut from Simply Sketched after I heat embossed them and coloured them in the same way. (I love those leaves!)

Finally the sentiment was stamped using the Perfect Pennants set. I really like this card and must knuckle down and make some more!

Hope you like it too!

Pxxx

Wednesday, 2 April 2014

Many Thanks

I received an order from a new customer very late on Monday evening, I was so very disappointed for the lady as she missed out on a whole heap of SAB goodies by just an hour!

So I wanted to make her an extra special Thank You card and have also put together a little box of freebies to make up for missing out.

This is the card I made and it uses a whole heap of different stamp sets - all of which seem to be firm favourites with me at the moment...


I used Gorgeous Grunge for the speckled background, Simply Sketched for the leaves, Petite Petals for the small flowers, Flower Shop for the big flowers, Papillon Potpourri for the butterfly and Happy Watercolour for the sentiment.

I also used a fair few punches, Petite Petals for the small flowers, Pansy for the large flowers, Bitty Butterfly, Artisan Label for the background to the sentiment (and Fancy Fan embossing folder) and the Small Scallop Circle to shape the 'banner' the sentiment is stamped on.


I hope you like it and look forward to posting again soon - hopefully my new customer will love it!

Paula xxx

Saturday, 1 March 2014

More Tulips...

Well - today the sun has shone and what a blessed relief with all the rain we've been having. Mind you despite the sun the footpaths are still a quagmire!

The dogs have been walked, the housework and washing done, the animals cleaned out, hubby is out for the evening so I'm treating myself to an evening of pure crafting! I expect to have some lovely things to show you!

Speaking of lovely things - my love affair with Blessed Easter continues with this little lovely!


I heat embossed the flowers, colouring them with my Blender Pen... cutting the panels with the Squares Framelits, dry embossing the top one with the Perfect Polka Dots embossing folder.


You can see more clearly here how I layered them.


Lastly I heat embossed the sentiment from Simply Sketched - the hostess set and punched it out using the Decorative Label punch before sponging the edges with white craft ink.

I'm really pleased with the result and now I'm off to hide away and craft to my hearts content... interruption free! I'm a little excited too as I'm making my first ever visit to Costco tomorrow... I'm thinking I should leave the credit cards at home!

Enjoy your weekend! xxxx

Monday, 13 January 2014

All White part 2

Back in October I designed and posted a card on my blog that lots of people have Pinned on Pinterest. It was suggested that it would make a lovely Sympathy card.

So I decided to revisit my design and have, indeed, used a sympathy sentiment from Simply Sketched. This is a hostess set available if you have a party or spend over £150.

Here is the card I made.


I wanted a subtle 'dash' of colour so used Crisp Cantaloupe from the In-Colour selection 2013/15.

The flowers are stamped using the new Petite Petals stamp set and punched out with the corresponding punch.


The aperture was die cut with one of the Apothecary Accents dies.

I also made this one.


This time I used Melon Mambo ink and a die from the Chalk Talk set. I think the pearls really do set off these little flowers.


And here was my original card...


I hope you all had a lovely weekend and will pop back and see what else I have to show you this week! I have been a crafty little bee!

EDIT - Is anyone interested in card classes? This is one of the cards we will be making when the products become available next month. I have 4 spaces and the cost will include refreshments, the stamp set in wood with the matching punch and an Ink Pad - £31.50 please use the 'contact me' tab to get in touch for further information!

If anyone can recommend any photo editing software for my IPad - that can handle layers for my watermark, please comment and let me know! xxx

Friday, 27 December 2013

More Vellum...

Just before Christmas I posted my Pop Up flower card as an example of something else you can do with Vellum - well today I have a couple more cards to show you with 3 techniques for Vellum.

This first card is the simplest - I have used the World Map background stamp on the Vellum, The Open Sea and Simply Sketched stamps with the Decorative Label punch, the aperture is cut using the Ovals framelits, the Map stamped on the opaque Vellum gives a really interesting background.


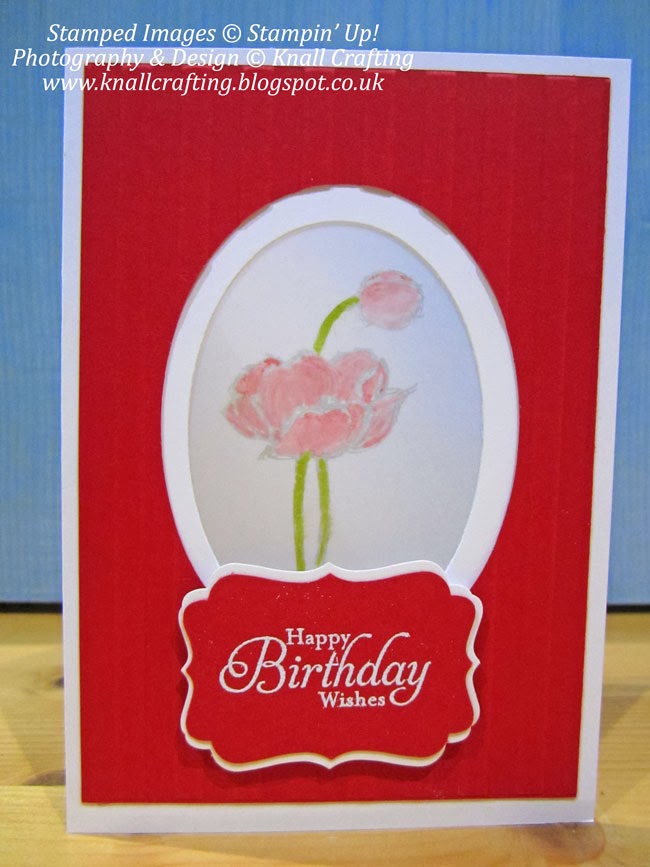
For the second card I stamped the Poppy from Simply Sketched on the Vellum - then coloured it with my Blender Pens. I have again used the Decorative Label punch and Ovals framelits. The colouring technique gives a really soft effect.


Lastly - and again really simple but so effective is the use of embossing folders on Vellum. I have used two different ones here - the Adorning Accents and Needlepoint Border.

You will also see I have used the Expressions Thinlits for the word Love... only available until the 1st of February.

Have you noticed the Sneak Peeks I managed to sneak in here? The Decorative Dots embossing folder and the Banner Blast stamp set with coordinating punch will all be available from the end of January - you will be able to select from one of these or the other fabulous items free with orders of at least £45 during Sale-a-Bration.


Anyhow - that's all from me today. I hope you had a lovely Christmas and are looking forward to the weekend as much as I am - especially as I am getting a new hairdo, hubby is off out and I'll have 2 whole days to myself for crafting.

Pxx


Saturday, 5 October 2013

All White

I love to see white cards, but I also like to add a little splash of colour.

Today's cards were inspired by one I saw on Pinterest (don't go there - I can spend hours just browsing!), the use of the dies to cut a window for the sentiment. The first is a Birthday card and I did a number of different colours afterwards - yet it is so unusual for me to make the same card twice!


The flowers are from the Flower Shop stamp set, punched out with the corresponding punch - buy them together and save 15% and the sentiment is from Simply Sketched. The Die is from Apothecary Accents.


I just added a few pearls and just loved this card on sight!

Then for all you lovely people who are already well on the way to being organised for Christmas, here is a seasonal version.


For this one I used the Northern Flurry embossing folder, the Christmas Ornament punch, some silver glimmer card cut into a snowflake using the Festive Flurry dies. The ribbon is 1/8" Taffeta in Real Red and the sentiment is from Petite Pairs.

I hope you have had a sparkly day and do visit my shop and check out all the fantastic products!

Paula xxx


Wednesday, 18 September 2013

Hostess Only set...

Today's post contains some really simple single layer cards, all made using the Hostess Only set - Simply Sketched. These Hostess sets are only available to be purchased using Hostess Pounds or On-Line Rewards.

This particular set just ticked all the boxes for me - I will just say - you are not limited to buying Hostess sets with your rewards... you can spend them on anything from the catalogues.

I'm not going to write very much more as I think Simply Sketched speaks for itself...

This first card is the most complex - I heat embossed the poppy on Vellum, dry embossed the top and bottom edges of the Vellum using the Needlepoint Border embossing folder and my Big Shot.


This second card, I coloured the poppy using my Stampin' Write Marker and used the sentiment from Million to One.


This card I coloured using ordinary coloured pencils to follow the Sketch theme.


This is another where I used Million to One. I just love the big bold sentiments in the set.


Finally the little bird was also coloured using my markers and a Blender Pen.


Hope you'll pop back for another post soon!

Paula xxx

Sunday, 15 September 2013

Challenge Entries.

OK - so I had to do just one more post before my holidays... especially as I had some time to kill.

I thought I would make a challenge entry, and strangely enough I was able to combine two challenges. I don't often manage that as I can usually only get my head round one thing at a time!

So today's card combines an entry into CAS Colours and Sketches and Dynamic Duos challenges.

I used the new Stylish Stripes embossing folder from the Autumn/Winter Seasonal and a stamp from Creative Elements for the background. then punched the strip of So Saffron card using the Scallop Trim border punch then added a strip of Organza Ribbon.


The topper was made by stamping the bird from the Simply Sketched hostess set, punching it out with the Extra Large Oval punch and layering it on a punched out Decorative Label.


I was quite pleased with how it turned out.

Don't forget you can order On-Line whilst I'm away!


Tuesday, 20 August 2013

Video Tutorial - Stamping Techniques

Well it's been a good few days again since my last post, so I'm posting another video tutorial. This shows 3 techniques, Masking, Sponging and how to use your Stampamajig...

Here is the card I made;


I hope you enjoy it! The stamp set I have used is Simply Sketched.

If you would like to order any products please e-mail or call me via the details on the contact tab above.

Back again soon!

Saturday, 17 August 2013

Framelit Partial Cut - Stampin' Up!

Sorry - I did it again! It was really late when our visitor left so I didn't post - and today I was doing the housework - then I got 'dragged' out to Prezzo's for supper - I am so full - I had 4 courses!!

Anyhow - here is one of the promised video tutorials.

I am often being asked how to make a card with a partial cut from a framelit. Making something like this -


Not sure if you can see - maybe this is a little clearer?


I used one of the Labels Collection Framelits and my Big Shot. Then decorated the card with my new Morning Post Numbers from the new catalogue coming soon (watch this space!), New Colour Collection Designer Series Papers and the hostess set - Simply Sketched.

Here is the tutorial on how to make one of these cards by making a partial Framelit cut...

You can decorate it any way you like!


I have two more videos to come over the next week so please come back and see!

I still have bookings available for September so why not give me a call on 07786 860438, or join my team and save on the products you buy.

Paula xxx