Hope everyone is having a great weekend and that you haven't been affected by the awful rain. My lawn is under water but fortunately that is the extent of the affect on us so far. Though the poor dogs are having to be hosed down after every walk!
I had a few e-mails about the Pop Up Card I posted the other day. So I promised to do a tutorial.
One of these days I will manage to produce something really slick - but in reality I'm just a crafter who likes to share and help other people so I hope you enjoy it!
Please Pin to Pinterest and share... if you would like to leave a comment for me that would be lovely too.
***Due to the punch not being released until the 28th of January... the video will be off-line until after that date. Apologies!***
Do have fun trying this for yourselves!
Paula xxx
Showing posts with label Video. Show all posts
Showing posts with label Video. Show all posts
Saturday, 4 January 2014

Sunday, 22 December 2013
Pop-Up Flower Card
Whilst poking about on t'interweb on Friday I came across a video and thought - Oooh - that would look so nice with some sponged Vellum... particularly as one of my customers said to me on Saturday "I haven't a clue what to do with Vellum!" I may share a few more tit-bits in the coming days!
So this afternoon I retired to my little craft room with my video camera and shot a little video tutorial for you.
I used the Boho Blossoms Punch, the Bird Builder Punch and the greeting from Blooming with Kindness...

So where's the Pop-Up bit I hear you ask... well here it is!!

Here's a close up of those gorgeous flowers - I expect you could do more with them... and the Video Tutorial is at the bottom of the page - just keep scrolling!

Enjoy - and please leave me a message to let me know how your creations turned out!
How lovely is it to move on from all those posts about Christmas Cards!
So this afternoon I retired to my little craft room with my video camera and shot a little video tutorial for you.
I used the Boho Blossoms Punch, the Bird Builder Punch and the greeting from Blooming with Kindness...

So where's the Pop-Up bit I hear you ask... well here it is!!
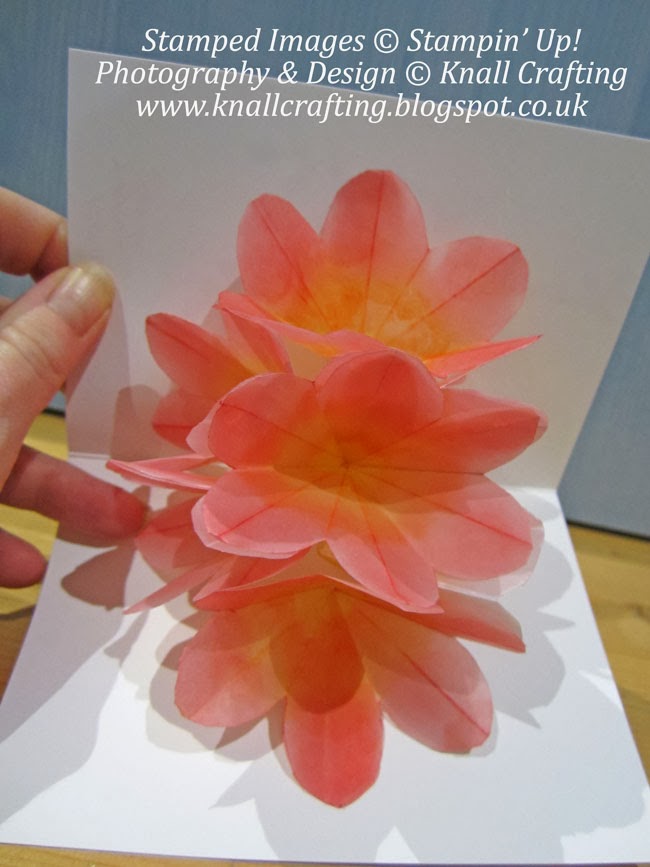
Here's a close up of those gorgeous flowers - I expect you could do more with them... and the Video Tutorial is at the bottom of the page - just keep scrolling!

Enjoy - and please leave me a message to let me know how your creations turned out!
How lovely is it to move on from all those posts about Christmas Cards!
Friday, 20 December 2013
It's not just me!!!
Well - it's officially contagious!!!
I can now share the naked truth!!!
Even the kitten is addicted to Pinterest. I just had to share! Hope it makes you smile on this windy evening!
Now I'm off to do some sneaky reading as I'm part way through a Lee Child, Jack Reacher novel on my Kindle!
I did all the housework after work today - I have the washing to do tomorrow, the animals to clean out then I have until the 2nd of January all to myself! Loads of crafting to be done methinks!
Laters people xxx
I can now share the naked truth!!!
Even the kitten is addicted to Pinterest. I just had to share! Hope it makes you smile on this windy evening!
Now I'm off to do some sneaky reading as I'm part way through a Lee Child, Jack Reacher novel on my Kindle!
I did all the housework after work today - I have the washing to do tomorrow, the animals to clean out then I have until the 2nd of January all to myself! Loads of crafting to be done methinks!
Laters people xxx
Sunday, 8 December 2013
Vellum LED Tealight Decoration - Video Tutorial
So I've seen lots of beautiful things made with Vellum, but I have very little patience and some of them seem very complicated.
I found something similar to these on Pinterest by various people so I decided to adapt them and make my own.
I spent hours last night crafting away and they are really rewarding.

Both the Santa (from Santa's List) and the Poinsettia (Joyful Christmas) are printed directly onto the vellum using MDS (My Digital Studio) which was fabulous as I was able to make them the exact size I wanted. Who would have thought you could print directly on Vellum - not something I ever considered doing previously! The nativity scene is from the 'Best of...' Christmas set as was the reindeer - who is embossed using black embossing powder.
I also added some Dazzling Diamonds... gotta' have sparkle at Christmas!

I'm not very good at colouring but the Vellum makes it so easy - and I couldn't live without my blender pens...
I will apologise that in places things are slightly out of shot. I have a trapped nerve in my neck and am really struggling - even worse now than earlier when I made the video - so there was no way I could re-shoot it - but I really wanted to share so you could all get creating before Christmas.
Have fun!
I found something similar to these on Pinterest by various people so I decided to adapt them and make my own.
I spent hours last night crafting away and they are really rewarding.

Both the Santa (from Santa's List) and the Poinsettia (Joyful Christmas) are printed directly onto the vellum using MDS (My Digital Studio) which was fabulous as I was able to make them the exact size I wanted. Who would have thought you could print directly on Vellum - not something I ever considered doing previously! The nativity scene is from the 'Best of...' Christmas set as was the reindeer - who is embossed using black embossing powder.
I also added some Dazzling Diamonds... gotta' have sparkle at Christmas!

I'm not very good at colouring but the Vellum makes it so easy - and I couldn't live without my blender pens...
I will apologise that in places things are slightly out of shot. I have a trapped nerve in my neck and am really struggling - even worse now than earlier when I made the video - so there was no way I could re-shoot it - but I really wanted to share so you could all get creating before Christmas.
Have fun!
Saturday, 17 August 2013
Framelit Partial Cut - Stampin' Up!
Sorry - I did it again! It was really late when our visitor left so I didn't post - and today I was doing the housework - then I got 'dragged' out to Prezzo's for supper - I am so full - I had 4 courses!!
Anyhow - here is one of the promised video tutorials.
I am often being asked how to make a card with a partial cut from a framelit. Making something like this -

Not sure if you can see - maybe this is a little clearer?

I used one of the Labels Collection Framelits and my Big Shot. Then decorated the card with my new Morning Post Numbers from the new catalogue coming soon (watch this space!), New Colour Collection Designer Series Papers and the hostess set - Simply Sketched.
Here is the tutorial on how to make one of these cards by making a partial Framelit cut...
You can decorate it any way you like!
I have two more videos to come over the next week so please come back and see!
I still have bookings available for September so why not give me a call on 07786 860438, or join my team and save on the products you buy.
Paula xxx
Anyhow - here is one of the promised video tutorials.
I am often being asked how to make a card with a partial cut from a framelit. Making something like this -

Not sure if you can see - maybe this is a little clearer?

I used one of the Labels Collection Framelits and my Big Shot. Then decorated the card with my new Morning Post Numbers from the new catalogue coming soon (watch this space!), New Colour Collection Designer Series Papers and the hostess set - Simply Sketched.
Here is the tutorial on how to make one of these cards by making a partial Framelit cut...
You can decorate it any way you like!
I have two more videos to come over the next week so please come back and see!
I still have bookings available for September so why not give me a call on 07786 860438, or join my team and save on the products you buy.
Paula xxx
Monday, 5 August 2013
Explosion Box
Hi there!
I've done another video for you today, though it isn't really a tutorial it just shows the explosion box I made.

Looks gorgeous just as it is doesn't it? I'm loving the new Stretch Ruffle Trim in the new In-Colours. It gets even better - just look at the decoration on the lid! The Quatrefancy, Speciality Designer Series Paper is stunning isn't it - You get two window sheets in a pack. But they are fancy ones, so best saved for box making rather than cutting down for this sort of project.

That butterfly is actually sitting on the flower! Held on with a glue dot it is light enough, and the vellum is rigid enough... I stamped the image from Flower Shop and coloured it with my Stampin' Write Markers, punched it out using the Pansy Punch - I call it something else in the video as my mind went blank... But I wasn't going to re-record! The butterfly is from Papillon Potpourri and punched out using the Bitty Butterfly Punch.
Here's my little video!
It's amazing how much seeing something can inspire you! I love using the Brayer and Blender Pens!
Here is the link to Caroline's video tutorial here. I'm so grateful for her inspiration!
Here is a close up of those gorgeous flowers... I just could not live without Vellum and Window Sheets!

Do let me know if you give it a try and I'll be back with something else really soon!
Paula xxxx
I've done another video for you today, though it isn't really a tutorial it just shows the explosion box I made.

Looks gorgeous just as it is doesn't it? I'm loving the new Stretch Ruffle Trim in the new In-Colours. It gets even better - just look at the decoration on the lid! The Quatrefancy, Speciality Designer Series Paper is stunning isn't it - You get two window sheets in a pack. But they are fancy ones, so best saved for box making rather than cutting down for this sort of project.

That butterfly is actually sitting on the flower! Held on with a glue dot it is light enough, and the vellum is rigid enough... I stamped the image from Flower Shop and coloured it with my Stampin' Write Markers, punched it out using the Pansy Punch - I call it something else in the video as my mind went blank... But I wasn't going to re-record! The butterfly is from Papillon Potpourri and punched out using the Bitty Butterfly Punch.
Here's my little video!
It's amazing how much seeing something can inspire you! I love using the Brayer and Blender Pens!
Here is the link to Caroline's video tutorial here. I'm so grateful for her inspiration!
Here is a close up of those gorgeous flowers... I just could not live without Vellum and Window Sheets!

Do let me know if you give it a try and I'll be back with something else really soon!
Paula xxxx
Saturday, 20 July 2013
Box Video Tutorial
Hello stampers! Well it's been blissfully cool today. Though I'm a bit gutted I didn't get the chance to work on my tan!
Last night I said an emotional goodbye to one of my customers who is moving abroad. I will really miss her as she is also a very good friend. I'll share the card I made in another post. In the meantime this is a long one with LOTS of piccies.
Since I took the pressure off myself I am really enjoying my crafting again. I have made loads of things to share with you. I just have to get round to posting!
Yesterday I was looking at boxes - I wanted something that would be really durable and professional looking. So I based my design on some of the boxes I have received things in, like chocolates and smellies at Christmas.
The first box I made was this:

Doesn't look much different does it? But watch the video and see how it is reinforced.
Here is the box from the video - finished off with a piece of the new Chevron ribbon - scrummy!

I love decorating the Window Sheets - I think it really adds that little something extra.

Tomorrow I'm going to share with you the contents of the first box - there was a sneak peek in the video... were you curious?
I love my Simply Scored... the possibilities are endless!
Back tomorrow!
Pxxx
Last night I said an emotional goodbye to one of my customers who is moving abroad. I will really miss her as she is also a very good friend. I'll share the card I made in another post. In the meantime this is a long one with LOTS of piccies.
Since I took the pressure off myself I am really enjoying my crafting again. I have made loads of things to share with you. I just have to get round to posting!
Yesterday I was looking at boxes - I wanted something that would be really durable and professional looking. So I based my design on some of the boxes I have received things in, like chocolates and smellies at Christmas.
The first box I made was this:

Doesn't look much different does it? But watch the video and see how it is reinforced.
Here is the box from the video - finished off with a piece of the new Chevron ribbon - scrummy!

I love decorating the Window Sheets - I think it really adds that little something extra.

Tomorrow I'm going to share with you the contents of the first box - there was a sneak peek in the video... were you curious?
I love my Simply Scored... the possibilities are endless!
Back tomorrow!
Pxxx
Saturday, 13 July 2013
Gorgeous Gift Boxes and Flower Tutorial
Well it's silly o'clock in the morning but as I didn't post yesterday I wanted something ready and waiting first thing this morning.
I was at a gig for my husbands band last night. They really rocked The George and Dragon in Princes Risborough! You can find out about other gigs by liking their Facebook page - King Loud
Yesterday I saw a great video by Stampin' Up! and fellow Pinkie - Lynne Fahey - showing us a gorgeous gift box made from a 12x12 sheet of card stock and a window sheet - so I had some miniature toiletries floating around and decided to make a box for them.

The box is Blushing Bride card stock decorated with Organza ribbon and the stamp set I used for the tag is Chalk Talk with the matching framelits - available as a bundle with 15% saving!
Here you can see the lid made with the Window Sheet just a little clearer.

Inside the box are tubes of Shower Gel, Body Lotion, Shampoo, Conditioner and a little soap. To fill the space above the soap I made a paper carnation using the large Scallop Circle punch.

You can just make it out - I used Rich Razzleberry card stock which is a lovely contrast with the Blushing Bride as you will have noticed on the label.
Here is a short video showing you how to make the flowers. If you would like instructions for making the box - please e-mail me and I will send them to you.
Have a great weekend! I know I shall be making the most of the sunshine! Sunday we have Pinkie Training - there will be loads of us getting together to craft and share inspiration - I'll post up pictures of my swaps tomorrow!
Paula xxx
I was at a gig for my husbands band last night. They really rocked The George and Dragon in Princes Risborough! You can find out about other gigs by liking their Facebook page - King Loud
Yesterday I saw a great video by Stampin' Up! and fellow Pinkie - Lynne Fahey - showing us a gorgeous gift box made from a 12x12 sheet of card stock and a window sheet - so I had some miniature toiletries floating around and decided to make a box for them.

The box is Blushing Bride card stock decorated with Organza ribbon and the stamp set I used for the tag is Chalk Talk with the matching framelits - available as a bundle with 15% saving!
Here you can see the lid made with the Window Sheet just a little clearer.

Inside the box are tubes of Shower Gel, Body Lotion, Shampoo, Conditioner and a little soap. To fill the space above the soap I made a paper carnation using the large Scallop Circle punch.

You can just make it out - I used Rich Razzleberry card stock which is a lovely contrast with the Blushing Bride as you will have noticed on the label.
Here is a short video showing you how to make the flowers. If you would like instructions for making the box - please e-mail me and I will send them to you.
Have a great weekend! I know I shall be making the most of the sunshine! Sunday we have Pinkie Training - there will be loads of us getting together to craft and share inspiration - I'll post up pictures of my swaps tomorrow!
Paula xxx
Wednesday, 10 July 2013
How to mount your Flower Shop stamps
Well folks - I had a play with the video again yesterday - I'm not 100% sure if I'm cut out for the film industry - but I hope the videos are useful.
Sam Donald, Pootler and fellow Pinkie posted a video on Facebook the other day, inspired by a couple of US demo's (her blog is here). It focusses on the new Flower Shop stamps, after watching Sam's video I decided I would make one too, using the wood mount stamps as I tend to prefer those to clear mount - but everyone has their own preference.
The main purpose of the video is how to mark and mount your stamps to be punched out using the co-ordinating Posy punch. It was noticed that far from being symmetrical each and every petal on the stamp, and thus the punch, was slightly different - this shows you how to match them up.
If you are interested in joining my team or buying Stampin' Up! products please get in touch and I can give you all the information you need!
Paula xxx
Sam Donald, Pootler and fellow Pinkie posted a video on Facebook the other day, inspired by a couple of US demo's (her blog is here). It focusses on the new Flower Shop stamps, after watching Sam's video I decided I would make one too, using the wood mount stamps as I tend to prefer those to clear mount - but everyone has their own preference.
The main purpose of the video is how to mark and mount your stamps to be punched out using the co-ordinating Posy punch. It was noticed that far from being symmetrical each and every petal on the stamp, and thus the punch, was slightly different - this shows you how to match them up.
If you are interested in joining my team or buying Stampin' Up! products please get in touch and I can give you all the information you need!
Paula xxx
Sunday, 30 June 2013
Video Tutorial - Decorated Kraft Box
Hi Guys!
Sorry - I did mean to post yesterday but I don't know where the day went! Well I do, cleaning, tidying, mowing my field, agility training with Blaze and then walking the dogs.
It does mean that today I can share with you another video tutorial of a decoration for one of the Stampin' Up! Kraft boxes. They are on page 160 of the new catalogue and are just £2.75 for four - an absolute bargain and great for packaging that special gift for someone.
So here is my finished box.

Here you can see the flower a bit clearer...

The mats were cut from Raspberry Ripple card stock.
Top - 8 x 8 cm
Sides - 8 x 5.5 cm
The DSP is Primrose Petals from the retiring In-Colour stack - that is being replaced with all new designs (can't wait) and you only need 6" x 6" to do this!
Top - 7.5 x 7.5 cm
Sides - 7.5 x 5 cm
And here is the video of how to make the flower - you need 4 shades of pink. I used Raspberry Ripple, Primrose Petals, Strawberry Slush and Pink Pirouette. You also need a hot glue gun and the Heart Punch and the Small Oval Punch. Have you spotted one of the new Very Vintage Designer Buttons in the middle there? They are gorgeous!
I hope you enjoy trying this for yourself and will be back tomorrow with a really fun card!
Paula xxx
Sorry - I did mean to post yesterday but I don't know where the day went! Well I do, cleaning, tidying, mowing my field, agility training with Blaze and then walking the dogs.
It does mean that today I can share with you another video tutorial of a decoration for one of the Stampin' Up! Kraft boxes. They are on page 160 of the new catalogue and are just £2.75 for four - an absolute bargain and great for packaging that special gift for someone.
So here is my finished box.

Here you can see the flower a bit clearer...

The mats were cut from Raspberry Ripple card stock.
Top - 8 x 8 cm
Sides - 8 x 5.5 cm
The DSP is Primrose Petals from the retiring In-Colour stack - that is being replaced with all new designs (can't wait) and you only need 6" x 6" to do this!
Top - 7.5 x 7.5 cm
Sides - 7.5 x 5 cm
And here is the video of how to make the flower - you need 4 shades of pink. I used Raspberry Ripple, Primrose Petals, Strawberry Slush and Pink Pirouette. You also need a hot glue gun and the Heart Punch and the Small Oval Punch. Have you spotted one of the new Very Vintage Designer Buttons in the middle there? They are gorgeous!
I hope you enjoy trying this for yourself and will be back tomorrow with a really fun card!
Paula xxx
Wednesday, 26 June 2013
First Video Tutorial...
I've finally done it! I've only had my camcorder for 2 years... and never put a video on You Tube!
Well Knall Crafting now has a You Tube 'account' and I'll hopefully be posting lots of exciting things for you.
Today I am posting a short video showing how to make a mould for your Simply Pressed Clay.
So here it is! It's not the most professional but I hope it's OK. Do let me know what you think by leaving me a comment.
I may not post tomorrow as I am off to the O2 to see Mrs Browns Boys...
But I'll be back on Friday. I still have that other card I was going to show you...
Paula xxx
Well Knall Crafting now has a You Tube 'account' and I'll hopefully be posting lots of exciting things for you.
Today I am posting a short video showing how to make a mould for your Simply Pressed Clay.
So here it is! It's not the most professional but I hope it's OK. Do let me know what you think by leaving me a comment.
I may not post tomorrow as I am off to the O2 to see Mrs Browns Boys...
But I'll be back on Friday. I still have that other card I was going to show you...
Paula xxx
Monday, 24 December 2012
Christmas Wishes
I would like to say Happy Christmas to all my customers, friends and followers.
I shall probably be taking advantage of the holidays to craft so will hopefully have some nice cards to share over the Christmas period.
In the meantime here's a Christmas message from Stampin' Up!
I hope you enjoy it!
I shall probably be taking advantage of the holidays to craft so will hopefully have some nice cards to share over the Christmas period.
In the meantime here's a Christmas message from Stampin' Up!
I hope you enjoy it!
I know there are lots of exciting things in store for the New Year from Stampin' Up! and I will bring you all the news as soon as it is released, so watch this space!
Happy Christmas!
Paula xxx
Subscribe to:
Posts (Atom)