Hope everyone is having a great weekend and that you haven't been affected by the awful rain. My lawn is under water but fortunately that is the extent of the affect on us so far. Though the poor dogs are having to be hosed down after every walk!
I had a few e-mails about the Pop Up Card I posted the other day. So I promised to do a tutorial.
One of these days I will manage to produce something really slick - but in reality I'm just a crafter who likes to share and help other people so I hope you enjoy it!
Please Pin to Pinterest and share... if you would like to leave a comment for me that would be lovely too.
***Due to the punch not being released until the 28th of January... the video will be off-line until after that date. Apologies!***
Do have fun trying this for yourselves!
Paula xxx
Showing posts with label Tutorial. Show all posts
Showing posts with label Tutorial. Show all posts
Saturday, 4 January 2014

Sunday, 22 December 2013
Pop-Up Flower Card
Whilst poking about on t'interweb on Friday I came across a video and thought - Oooh - that would look so nice with some sponged Vellum... particularly as one of my customers said to me on Saturday "I haven't a clue what to do with Vellum!" I may share a few more tit-bits in the coming days!
So this afternoon I retired to my little craft room with my video camera and shot a little video tutorial for you.
I used the Boho Blossoms Punch, the Bird Builder Punch and the greeting from Blooming with Kindness...

So where's the Pop-Up bit I hear you ask... well here it is!!

Here's a close up of those gorgeous flowers - I expect you could do more with them... and the Video Tutorial is at the bottom of the page - just keep scrolling!

Enjoy - and please leave me a message to let me know how your creations turned out!
How lovely is it to move on from all those posts about Christmas Cards!
So this afternoon I retired to my little craft room with my video camera and shot a little video tutorial for you.
I used the Boho Blossoms Punch, the Bird Builder Punch and the greeting from Blooming with Kindness...

So where's the Pop-Up bit I hear you ask... well here it is!!
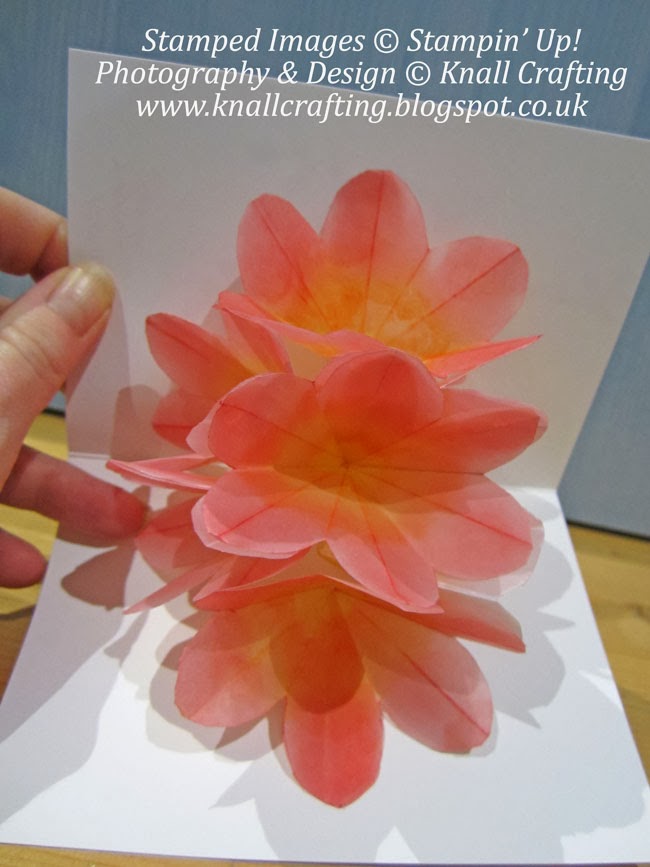
Here's a close up of those gorgeous flowers - I expect you could do more with them... and the Video Tutorial is at the bottom of the page - just keep scrolling!

Enjoy - and please leave me a message to let me know how your creations turned out!
How lovely is it to move on from all those posts about Christmas Cards!
Saturday, 13 July 2013
Gorgeous Gift Boxes and Flower Tutorial
Well it's silly o'clock in the morning but as I didn't post yesterday I wanted something ready and waiting first thing this morning.
I was at a gig for my husbands band last night. They really rocked The George and Dragon in Princes Risborough! You can find out about other gigs by liking their Facebook page - King Loud
Yesterday I saw a great video by Stampin' Up! and fellow Pinkie - Lynne Fahey - showing us a gorgeous gift box made from a 12x12 sheet of card stock and a window sheet - so I had some miniature toiletries floating around and decided to make a box for them.

The box is Blushing Bride card stock decorated with Organza ribbon and the stamp set I used for the tag is Chalk Talk with the matching framelits - available as a bundle with 15% saving!
Here you can see the lid made with the Window Sheet just a little clearer.

Inside the box are tubes of Shower Gel, Body Lotion, Shampoo, Conditioner and a little soap. To fill the space above the soap I made a paper carnation using the large Scallop Circle punch.

You can just make it out - I used Rich Razzleberry card stock which is a lovely contrast with the Blushing Bride as you will have noticed on the label.
Here is a short video showing you how to make the flowers. If you would like instructions for making the box - please e-mail me and I will send them to you.
Have a great weekend! I know I shall be making the most of the sunshine! Sunday we have Pinkie Training - there will be loads of us getting together to craft and share inspiration - I'll post up pictures of my swaps tomorrow!
Paula xxx
I was at a gig for my husbands band last night. They really rocked The George and Dragon in Princes Risborough! You can find out about other gigs by liking their Facebook page - King Loud
Yesterday I saw a great video by Stampin' Up! and fellow Pinkie - Lynne Fahey - showing us a gorgeous gift box made from a 12x12 sheet of card stock and a window sheet - so I had some miniature toiletries floating around and decided to make a box for them.

The box is Blushing Bride card stock decorated with Organza ribbon and the stamp set I used for the tag is Chalk Talk with the matching framelits - available as a bundle with 15% saving!
Here you can see the lid made with the Window Sheet just a little clearer.

Inside the box are tubes of Shower Gel, Body Lotion, Shampoo, Conditioner and a little soap. To fill the space above the soap I made a paper carnation using the large Scallop Circle punch.

You can just make it out - I used Rich Razzleberry card stock which is a lovely contrast with the Blushing Bride as you will have noticed on the label.
Here is a short video showing you how to make the flowers. If you would like instructions for making the box - please e-mail me and I will send them to you.
Have a great weekend! I know I shall be making the most of the sunshine! Sunday we have Pinkie Training - there will be loads of us getting together to craft and share inspiration - I'll post up pictures of my swaps tomorrow!
Paula xxx
Wednesday, 26 June 2013
First Video Tutorial...
I've finally done it! I've only had my camcorder for 2 years... and never put a video on You Tube!
Well Knall Crafting now has a You Tube 'account' and I'll hopefully be posting lots of exciting things for you.
Today I am posting a short video showing how to make a mould for your Simply Pressed Clay.
So here it is! It's not the most professional but I hope it's OK. Do let me know what you think by leaving me a comment.
I may not post tomorrow as I am off to the O2 to see Mrs Browns Boys...
But I'll be back on Friday. I still have that other card I was going to show you...
Paula xxx
Well Knall Crafting now has a You Tube 'account' and I'll hopefully be posting lots of exciting things for you.
Today I am posting a short video showing how to make a mould for your Simply Pressed Clay.
So here it is! It's not the most professional but I hope it's OK. Do let me know what you think by leaving me a comment.
I may not post tomorrow as I am off to the O2 to see Mrs Browns Boys...
But I'll be back on Friday. I still have that other card I was going to show you...
Paula xxx
Friday, 3 May 2013
Tutorial - Framelit Partial Cut
I had quite a few enquiries asking me how I did the partial cuts with the framelits and Big Shot yesterday.
I'm rubbish at videos so I thought I would use a few photo's to illustrate the technique...
Firstly cut your cardstock and decide where the first cut needs to be.
Line up your framelit and put the cutting pad so it only goes as far onto the cardstock as you need to cut - as per the photo below...

Run it through the big shot and it will only cut the cardstock under the cutting mat.

repeat by lining up on the opposite side where you want to cut as shown here...

Then simply trim off the excess!
Dead simple!

I hope that makes sense!
Back soon!
Pxx
I'm rubbish at videos so I thought I would use a few photo's to illustrate the technique...
Firstly cut your cardstock and decide where the first cut needs to be.
Line up your framelit and put the cutting pad so it only goes as far onto the cardstock as you need to cut - as per the photo below...

Run it through the big shot and it will only cut the cardstock under the cutting mat.

repeat by lining up on the opposite side where you want to cut as shown here...

Then simply trim off the excess!
Dead simple!

I hope that makes sense!
Back soon!
Pxx
Subscribe to:
Posts (Atom)